Sunday, April 23, 2023

Fun. and Funky Thanks

 I decided to play along one more time with the Gina K Designs April monthly challenge to do some reverse stenciling, but I was also inspired by Gina's recent video  using a a gel pen and decided to use both techniques. 


Fun and funky results!   I first ink blended with Gina K Designs inks in passionate link, tangerine twist and wild dandelion.  I then placed the Rose Swirl stencil over it and ink blended some black ink over the stencil.  I then used a white gel pen to add the polka dots.   I due cut the sentiment with the Thanks and Shadow die and stamped. a sentiment from the Stitched Leaves stamp set.   

Saturday, April 15, 2023

Reverse Stenciling

 Tonight I created another card for the monthly Gina K Designs challenge featuring the reverse stenciling technique.  


All products are by Gina K Designs.  I blended some medium spruce and light spruce ink onto white card stock and then placed the Water Droplets stencil over it and blended on some black ink.  

I used the Radiant Roses Embossing Folder and the Radiant Roses Layering Stencil with light spruce and medium orchid ink to create the rose and fussy cut the mage out.  Since the background has a dramatic flair to it, I thought layering the rose over black card stock would be add to the drama.   I stamped a sentiment from the Bold Bloom stamp set to complete the card. 


FMS581- Hello

 I didnt; get a chance to do any crating last weekend and I don't have lots of time this weekend, BUT I did kick off my Saturday by playing along with the Freshly Made Sketches Challenge #581 with some of my newest crafty purchases that I picked up at Butterfly Reflections Ink.  


This card features the Gina K Designs Heartfelt Bouquet stamp set and the Brick Wall Stencil.  I first ink blended with the stencil and some soft stone ink for a soft background.  I colored the flower with copics in RV09, RV05, RV02 with undercoloring done in BG01.   The leaves were colored with YG67 and YG63.   I fussy cut everything out, popped the flower up with foam take and tucked the leaves under it.  I decided it need a little touch of gold so I due cut the added leaves with a due from the Altenew Branches and Berries die set.     I really liked the "hello" stamp in the stamp set, but it was too large to place over the flower (like in the sketch) so I opted to move the sentiment to the bottom cover of the card.

Here is the sketch:


Monday, April 3, 2023

Weekend Craftiness

 Catching up on some blogging....not that people seem to come blogs anymore, but if you are here...Hello! I don't even think blogs are required for my design teams anymore.   That was news to me when I returned to the stamping world.  Funny how things change.  I blog mostly then upload my work to Pinterest.  

Posting a cards from my most recent weekend crafting time:


|
Altenew Courageous You stamp set color with copics


Altenew Blossom & Bloom stamp set colored with copics. 


Watercolored tag created with the Penny Black Exuberance stamp set 


Spotlight Technique

 Gina K Designs does weekly live videos and 5 minute card videos and I like to use them as weekly inspiration.   This week she did the spotlight technique with stencils.  I decided to do the same technique using stamps rather than stencils.   This week is an "Anything Goes" Challenge on the Simon Says Stamp Wednesday Challenge so I am submitting my card  there.


I stamped the image Gina K Designs Flowers For You twice using my Misti.   I die cut a circle from one of the images and layered onto a black circle.  I colored the die cut image with copics and lined it up onto remaining stamped image.  I stamped a sentiment from the Gina K Designs Sketched Flowers stamp set, 


Saturday, April 1, 2023

Reverse Stenciling

 Gina K Design's April challenge is to use the reverse stenciling technique.  Never have I ever been on such an emotional roller coaster while creating a card!!  

I started by doing my ink blending with some Gina K Design inks (which I love to do).  To do reverse stenciling, you brush black all over your ink blended card stock.   It felt SO wring doing it, BUT pulling the stencil back and seeing the result was such a relief!  I used the Thick Brush stencil. 


Now, it's got a pretty wild vibe to it and this card isn't for everyone, but it definitely IS for someone! I used I used the Thanks and Shadow die to create the sentiment and I do like how it pops off the bright pink panel.  

Techniques and Challenges Galore

 Decided to challenge myself by creating one card that would work for multiple challenges. I created this card for:

1.  Gina K Designs April challenge to use the reverse stenciling technique

2. CAS on Friday Challenge #254 to use dots

3.  The Sisterhood of Crafters Challenge to use rainbow colors. 


I started by die cutting some circles from some masking paper and laid that over my card stock.  I ink blended in rainbow colors and then used the Gina K Designs Sunshine stencil to do the reverse stenciling.  It's a weird thing to rub black ink all over your ink blending, but it's a relief when you remove the stencil.  I used the Gina K Designs You die and cut out the word 4 times and layered them on top of one another to create some dimension.   I heat embossed the sentiment from the Gina K Designs Flowers For You stamp set and popped it up with foam tape.  

FMS579 - Birthday Wishes

 Kicking off my crafty weekend time by playing along with the Freshly Made Sketches Challenge is becoming a routine and I like it! 


I used all Gina K Designs products to make this card.  I first used some Turquoise Sea Fancy Foils and a Delicate Basket Poly-Glaze Foiling Sheet and ran that through my laminator to foil the oval.  I stamped the floral image from the Spring Bouquets stamp set, colored it with copics, and fussy cut it out.  There is a coordinating die, but I am perfectly capable of fussy cutting it out so I saved on the dies  in order spend the money on other supplies.    I stamped the butterfly from the Butterfly Trio stamp set, colored that with copics, and fussy cut that as well.   I heat embossed the sentiment.  

Here is the sketch:


Saturday, March 25, 2023

FMS578 - Still Cozy

 Playing along with this week's Freshly Made Sketches challenge #578 to get the creative juices flowing to kick off my Saturday morning crafting. 


Got my first stamp set by Colorado Craft Company called Lots of Love.  I just love these snuggle bunnies!  I don't have much time at all to craft during the week, but I did stamp out a number of things I wanted to color this week and this was one of them.  I masked off the bunnies to do some ink blending wit some Gina K Designs ink to create the sunset.  I used wild dandelion, lemon drop, peach Bellini, light orchid, medium orchid and wild wisteria. I splattered some diluted white acrylic ink before removing the mask.  I colored the grass and bunnies with copics and heat embossed the sentiment in white. 

I couldn't;t find any patterned paper that I really loved to pair with the image so I created my own with some ink platers using the same colors from the ink blended sunset.  

Here is the sketch:


Sunday, March 19, 2023

Bright and Sunny Birthday Wishes

 I pretty much never do any card making during the week because I work stupid long days and barely have the energy to cook dinner before winding down for the night.  Now that both of kids are to college, it's not unusual for us to be in bed by 9:00 or so.   We laugh at ourselves.  #old

I do look forward to Saturday mornings in particular when I know I will jump out of bed to make a cup of coffee, put on some country music, and get going on some crafting.  This is 100% a stress reliever for me a creative outlet.  I stepped away for almost 7 years to finish raising my family, but I a so happy to be back into hobby of mine again. 

Gina K. Designs was a stamp company that NEVER interested me 1st time around.   Stampy stamps?   Nooooo.   Wasn't my style at all.   I colored with copics.....and that was it.  Seven years later and now I infrequently use my copics and I am OBSESSED with Gina K Designs producet.  

Here I made a bright and sunny birthday card with some of my newest products from my most recent haul:


All products used are from Gina K Designs.   I started out with the Mega Flowers stencil.  I used small blending brushes to ink of the flower centers with wild dandelion and tangerine twist ink.  Then I finished ink blending the flowers with passionate link and bubblegum ink.  

To create the sentiment panel, I used the Sketched Flowers stamp set.  I did the ink thumping technique on the flower with the same inks used in the stencil and then stamped the sentiment in obsidian amalgam ink.  I added a few lemonade sequins to embellish. 

Birthday Wishes

 Still working on building up my stash of birthday cards.  For some reason, I seem to choose everything BUT birthday sentiments when making cards so I need to make a conscious effort to make them.


I started with a piece of watercolor paper and embossed that in the Altenew Bold Floral Drape 3D embossing folder.  I used distress oxide inks to watercolor the flowers and the background.  I put it back into the embossing folder when it dried and ran it through one more time really pop the images back up.  

Tried out my brand new Tim Holts Tonic Rotary Media Trimmer for the first time making this card and OH DO I LOVE IT!    Worth every penny!   I was just not 100% with any of the 4 paper trimmers I have....but 5th cutter is a charm!   Highly recommend!   I cut my card stock at an angle to create space the sentiment added a small white strip of card stop to highlight the identical line.   Straight as an arrow!   Love that cutter!   

I chose a sentiment from the Gina K Designs Radiant Roses stamp set to complete the card and stamped on an angle.  

Elegant Birthday Wishes

 Re-discovered the Altenew Garden Rose 3D embossing folder from the Craft Your Life Project Kit: Garden Rose bundle.  this week and decided to make an elegant birthday card. 


I started by ink blending some Gina K Design Inks in dark orchid, medium orchid, light orchid, and powder blue.  I spritzed the back of my card stock panel with water before embossing it in the embossing folder to prevent the card stock from tearing. I dragged a white pigment ink pad across the embossing to really highlight it and dusted on some ranger perfect pearls.   I die cut the MFT All About You die x3 and glued them together to create dimension.  I hear embossed the sentiment in white from the coordinating stamp set.  


Colorful Birthday Wishes

 Weekend crafting.......it's what I am up to these days! This weekend I am intentionally trying to focus on some some birthday cards to build up my stash. 


I started by doing some ink blending with Gina K Design inks in wild wisteria, passionate pink, tangerine twist, and wild dandelion.  I spritzed the back of my card stock panel before running it through my.Platinum Six in the Simon Says Stamp Magnolia Branches 3D embossing folder so that the card stock wouldn't break down.  I then used a white pigment ink pad and dragged it over the embossing to really highlight it and dusted on some Ranger Perfect Pearls.  

I heat embossed the sentiment from the Gina K Designs Radiant Roses stamp set in black onto vellum and added a few sequins.  

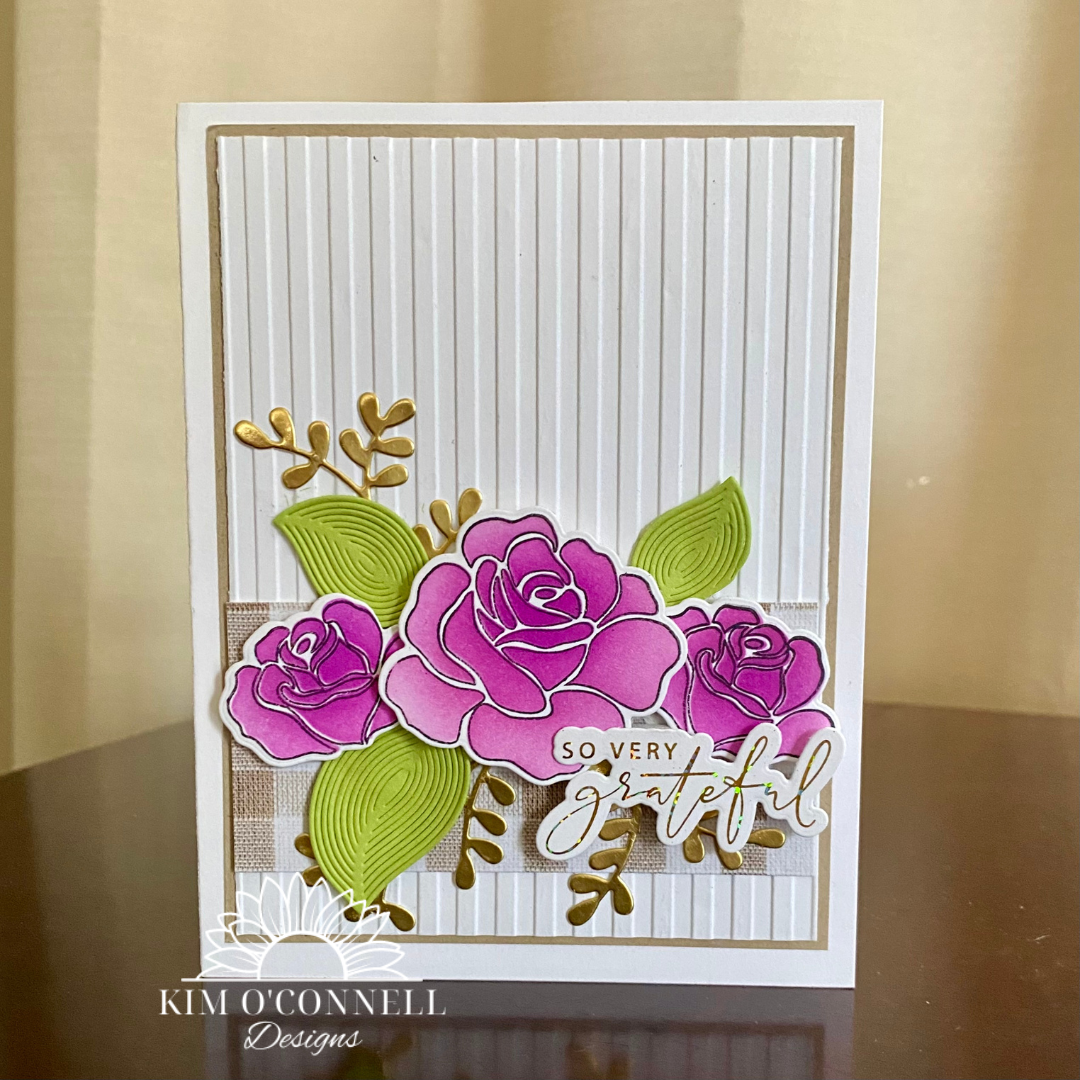
FMS577 - So very Grateful

 I'm playing along  with this week's Freshly Made Sketches challenge #577 today.


I am playing along with the Gina K Designs Radiant Rose Layering Bundle.   I stamped the roses in Gina K Designs obsidian amalgam ink and then used the stencils to ink blend with light orchid, medium orchid, andd dark orchid ink.   I die cut them out and popped them up with foam tape.  I used the Radiant Roses Words Foiling Sheets and the Fancy Foils Gold Sequins to create the foiled sentiment.   The layering bundle inclues the die cuts for the sentiments well.   

For added texture, I chose the Simon Says Stamp Whirl Leaves die and also die cut some additional leaves in gold cardstock with the Simon Says Stamp Fiddly Leaf die.  I also chose some patterned paper from the Gina K Designs Autumn Splendor 6x6 paper pad to tuck behind the flowers.   I embossed the background layer with an old embossing folder....and I have no idea who makes it.  :)

Here is the sketch:


Sunday, March 12, 2023

Time Out Challenge #233 - Elegant

 "Springing ahead" today and it it good for my soul!   There is something hopeful about adding more light back into our days and hearing the birds chirping this morning.  Winter depresses me.  I don;' know how I have survived my entire life living in New England.  Not a fan of winter at all! 

I am playing along with the Time Out Challenge #233 which is to create something elegant so decided to play along with the Simon Says Stamp Beautiful Flowers stamp set.


I am really wanting to learn how to watercolor ad have started watching a few technique video. I ordered myself some brushes, but they haven't arrived yet. I am curious to see what kind of results I get when using those brushes.  For now, I used the Altenew Watercolor brushes and colored the image with Arteza Real Brush pens.  The sentiment is from the Waffle Flower Essential Sentiments stamp set. 

Saturday, March 11, 2023

SSSWChallenge - Tag It

 Today I am playing along with the Simon Says Samp Wednesday Challenge - "Tag It!"  I am really liking Penny Black stamps these days!  They have a nice mix of beautiful florals AND cute little critters and cool dies so it's a nice mix for me as I continue what the heck my style is in the round 2 of being in this paper crafting world.  

Today I made a tag wit the pretty Exuberance stamp set from the new Penny Black release.

I stamped my image on watercolor paper with momento black ink and used Gina K Designs re-inkers in  Passionate Pink, Wild Wisteria and medium spruce inks.  I added some sea glass ink around the image. 

Watercoloring is new to me.  I like it, but I need to keep practicing and learning.   I have started to check out Sandy Allnock's youtube channel for some tips.  Got any recommendations for any other artist's youtube channels?  I'm all ears! 


GDP484 - A Birthday Wish for You

 This week I received the new Gina K Designs Radiant Roses Layering Bundle (and other goodies) from the newest release so know I was going to creating something with that as soon as Saturday rolled around!   This bundle is a really great deal!   For $44.95 you get a full size stamp set, an embossing folder, stencil set, and all of the coordinating dies!   I decided to play along with the Global Design Project's challenge #384 which is a "CASE the designer" challenge this week.  


I started with some 140 lb Canson Montval watercolor paper  and added a wash of color with some watered down Gina K Designs sea glass ink.  After it dried, I splattered some additional color onto it.  

I stamped and die cut the rose and leaves and then ink blended using the coordinating stencil and some medium orchid, bubblegum pink, sweet mango and grass green ink.   The Radiant Roses Words poly-glaze sheets don't come with the bundle, but they are only only $6.95 so it was a "worth it" add on for me.  I ran off the sheets with some Gina K Designs Gold Sequins Fancy Foils through my laminator in a carrier sheet.  I then die cut the sentiment with one of the dies that comes with the bundle.  I added a few sequins to embellish.  I almost always mount my finished design on a white card base, but I liked how the blue card stock really made the watercolored background stand out more.  

Here is the pretty card I was CASEing for the challenge:


Saturday, March 4, 2023

More Ink Cube Thumping

I'm continuing with the ink cube  thinping technique to play along aagainwith the Gina K Designs monthly challenge.  Let me start by saying, I am not really a pastels kind of girl so I am not sure what possessed me to make this card in pastels.... and I kind of want to make it again in a hole different color scheme because I do like the design I came up with for this card.  Some people DO like pastels so hopefuily it will appeal to whomever receives it.  :)


All supplies used are from Gina K Designs.  First I used the Sunshine stencil with some bubblegum pink ink to create the background panel.  Next I ink blended with dark lilac, medium liac, light lilac, and bubble gum pink.   I then splatter some watered down medium lilac ink.  Then I stamped the floral image from the You are Enough mini stamp set in momento black ink.   Then I restamped the image but this time stamped it in bubblegum pink and then "thumped"on some light liac as well before stamping.   I fussy cut the blooms and popped them up with foam take.   Finally, I heat embossed the sentiment.  


Copic Coloring over Ink Blending

 I just love the Unity Newsprint Floral Greetings background stamp for a quick but beautiful card!   I've made a few cards with it now, but each card has a very different feel to it.   This time I did some copic coloring over ink blending. 


I stamped the image with Momento Tuxedo black and then ink blended some Gina K Designs inks in light spruce, powder blue and medium lilac.  I then colored the flowers and leaves with copics in similar tones.  I used a white Prismacolor pencil to add some highlights and a black one create some additional shadows on the center of the flowers.  I used the Gina K Designs You die and a heat embossed sentiment from the MFT All About You stamp set.


Ink Cube Thumping Technique

 Today I am playing along with the new Gina K Design's monthly challenge which is to do the ink cube thumping technique.  You can watch THIS video to learn how to do it.  You must be part of the Gina K Designs You must be part of the Gina K Designs & Stamp TV Friends facebook group to play along with the challenge.  I highly recommend the group for lots of crafty inspiration! 


I did some masking first and stamped the MFT Romantic Script background stamp in Gina K Designs soft stone ink.   I then did my ink cube thumping with light spruce and blue denim ink onto that pretty branch of leaves from the Gina K Designs Filled with Sunshine mini stamp set.   I heat embossed the sentiment from the Gina K Designs Bold Bloom mini stamp set.  It was actually a pretty quick and easy card to make!