Each month the MFT Designers are given a creative challenge to tackle and this month we were asked to get creative with with stenciling techniques. Now, let me first be honest and say that using stencils was just not something I do, but a challenge is a challenge.
Now, let me tell you one more thing.........
I am now HOOKED ON STENCILS!
Why, oh why haven't I used them sooner?!
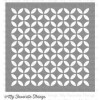
First let me show you a card I made using the
Petal Circles stencil.
I made this clean and simple card using some smooth white, sweet tooth, sno cone, and kraf CS.
I started with a smooth white 2.5" square piece of CS. I taped the CS down to my mat and the used some washi tape to take the Petal Circles stencil down over it. I first sponged some sno cone ink over the stencil and then sprayed some
sheer shimmer mist over it. I then lifted the stencil and used a heating tool to dry the ink. I cleaned my stencil and shifted it to the left a bit and taped it down again. This time I sponged some natural ink over the stencil and again sprayed some sheer shimmer mist over it before removing the stencil. I again dried it with my heating tool before cutting the CS into equal squares. I matted with kraft CS and sno cone CS. I added some hemp cord and sno cone button to embellish. I stamped the sentiment from the
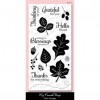
Essential Sentiments stamp set in hot fudge ink.
I repeated the same sponging and misting process to create the strip to add interest to the inside of the card. The shimmer mist not only adds shimmer, but slightly softens your colors.
Now I used the same
Petal Circles stencil again but with bold colors to create a totally different feel.
This time I paired some smooth white, black licorice, and razzle berry CS.
I used the same method to sponge the ink on the stencil to create this card though this time I used black licorice and razzle berry ink. I did not use he shimmer this time to keep the colors bold and vibrant. I stamped a sentiment from the
Dandelion Designs stamp set in black licorice ink.
I repeated the sponging pattern to create a strip to add to the inside of the card to create added interest.
Same stencil........but 2 totally different "feels" to the cards, right? Who needs patterned paper when you can create your own with stencils!
OK, and now for my grand finale! I used modeling paste with the
Stripes Stencil! I was always a little intimidated by the modeling paste, but this stuff is pretty cool! It add nice texture to your cards!
I started with a natural CS base and secured it to my mat with washi tape. I layered the
Stripes Stencil over it and secured it with washi tape. I spread the modeling paste over the stencil. I removed the stencil and et the paste dry. I matted the striped panel with hot fudge CS and adhered it onto the grape jelly CS card base.
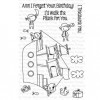
I inked up the
Forget Me Not stamp set with gumdrop green, grape jelly, and lemon drop ink. I stamped the sentiment in hot fudge ink onto a panel I die cut using a die from the
Die-namics Blueprints 2.
For the inside, I stamped another flower from the
Forget Me Not stamp set in gumdrop green, grape jelly, and lemon drop ink onto smooth white CS and then matted with hot fudge CS.
Now head to the
MFT blog to see a list of MFT Designers participating in the creative challenge!
If you are feeling inspired and want to check out the MFT stencils, you can find them all
HERE!


.jpeg)